Simple Text Document
Overview
Teaching: 0 min
Exercises: 0 minQuestions
How do I start a LaTeX document?
Objectives
Explain the sections of a LaTeX document
Understand how LaTeX distinguishes text from command
Learn about commenting your code
Create a preamble which generates a simple document
Create title section
Perform simple tasks using both functions and environments
Change the document class
Use a nonstandard document class
Learn about what a package is and how to import one
Learn where to read more about libraries
Use custom library functions
Compile a document for the first time and save the PDF.
In this episode we will learn the essential structure of a document produced in LaTeX, and we will begin to create our first document.
Document Organization
When creating a document in a WYSIWYG editor, we tend to think of the document as a whole. We think as writers. Each portion of the document is a jumble that must be perfected as it is written.
When a document is created in LaTeX, we must write commands like programmers. Each portion of the document may be constructed independent of content or context. Commands are given which will perform the same function upon each compile. Just as we run commands like programmers, we must learn to think like programs. Each portion of the LaTeX markdown language must follow orders (or commands) that can be interpreted by the compiler and have logical flow.
For this reason, we organize our document into parts which compromise between making sense to the compiler and making sense to the operator. In the most general sense, we divide a .tex document into preamble, and content sections. The preamble is where we tell the compiler everything it needs to know to be able to process the content within while the content section contains the actual text, information, figures, etc. that the final document will contain.
We distinguish these sections by restricting them to an
environment. For example, the content of a document will
be entirely contained within an environement we call document. An environment must have a
beginning and an end, making it look like:
\begin{document}
  our document's contents
\end{document}
The minimum acceptable document in LaTeX must include declaring the documentclass, then using a
document environment.
\documentclass{minimal}

\begin{document}
  The simplest document
\end{document}
The documentclass tells the LaTeX interpreter program what style to apply to our output. There
are many different document classes aside from minimal which we will discuss later, but for now,
we will confine all of our experiments and learning in this format.
The code is organized such that all of the declarations about how LaTeX should form the document,
including documentclass are placed in the preamble. Everything else must be bound by the
document environment.
Commands and Environments
The entirety of “our document’s contents” is bound by commands. We can tell that these are
commands in LaTeX, commands are declared with the backslash (\). An environment will begin and
end at the boundaries declared. The document, therefore is an environment. There are many
other environments that can be used in LaTeX. All of them must begin and end. Environments
may be nested. This means that one can be put into another.
However, a nested environment must begin and end in order as the nest gets deeper. So if we
want to use a math mode environment (something which will
be discussed later in this lesson) with an equation we would use:
\begin{document}
  \begin{equation}
    our equation
  \end{equation}
\end{document}
Some commands in LaTeX are not treated as environments. These direct commands are also called
using the backslash (\), but they do not have be told where to begin and end. A command executes
only once each time it is called. Within the math mode environment above, we will execute a
command to insert the special character for the lowercase Greek letter, sigma (σ).
\begin{document}
  \begin{equation}
    \sigma
  \end{equation}
\end{document}
σ
Commands can have one or more argument when it is called.
An argument modifies the command in some manner. In LaTeX, optional arguments are declared using
braces ([ and ]). Main arguments are declared within curly braces ({ and }).
When you experience and eror when compiling your document, always check your curly braces
If a command is called without using these characters, LaTeX will assume you included a set of empty curly braces. Thus,
\someCommand
defaults to
\someCommand{}
Since the command \sigma used above does not require an argument, it is accepted by the
compiler. Some commands require one or more argument to function. In this case, the compilation
would fail and give an error. It is important to know what each command requires when you use it.
Special Characters
LaTeX reads each character written in the code and interprets it based on the context. Certain
characters such as the back slash \, as we have seen, have special properties. But what if we
wish to use a character in our document that has been assigned as a special character? In this
case, we must tell LaTeX to treat the character like text instead of as a command. For this purpose, LaTeX provides
escape sequences which print the character. These
escape sequences operate similar to commands by telling the program do a specific action and not being present in the final document. So if we wish to include a back slash in our text,
we use the command \textbackslash:
\textbackslash
\
Most special characters are escaped with a backslash and the symbol, but others require a command phrase. The correct command phrase may be esoteric to a novice LaTeX user, and difficult to remember. There are many sources available on the internet which can assist with finding the ‘magic word’. The following characters are common examples that have special meaning within LaTeX, and require escape sequences:
\& \% \$ \# \_ \{ \} \textasciitilde \textasciicircum \textbackslash
& % $ # _ { } ~ ^ \
Each of these symbols, un-escaped, affect the compilation of the LaTeX code. For example, use of
the percent sign (%) tells LaTeX to treat the rest of the line as a
comment. Comments allow the user to hide text such as notes
to other authors or unused code from the compiler, such that it does not appear on the final
document.
Print this text but not
%this text
comments
Print this text but not
comments
Titles
Title and author information are stored as variables using the \title and \author commands,
respectively. In most default LaTeX document styles, individual authors are separated with \and.
The LaTeX backend will handle separating them with commas or other formatting sequences
automatically. To add author information such as affiliation or addresses, the \thanks sequence
can be called. Information within the curly braces will be printed in a manner consistent with the
style.
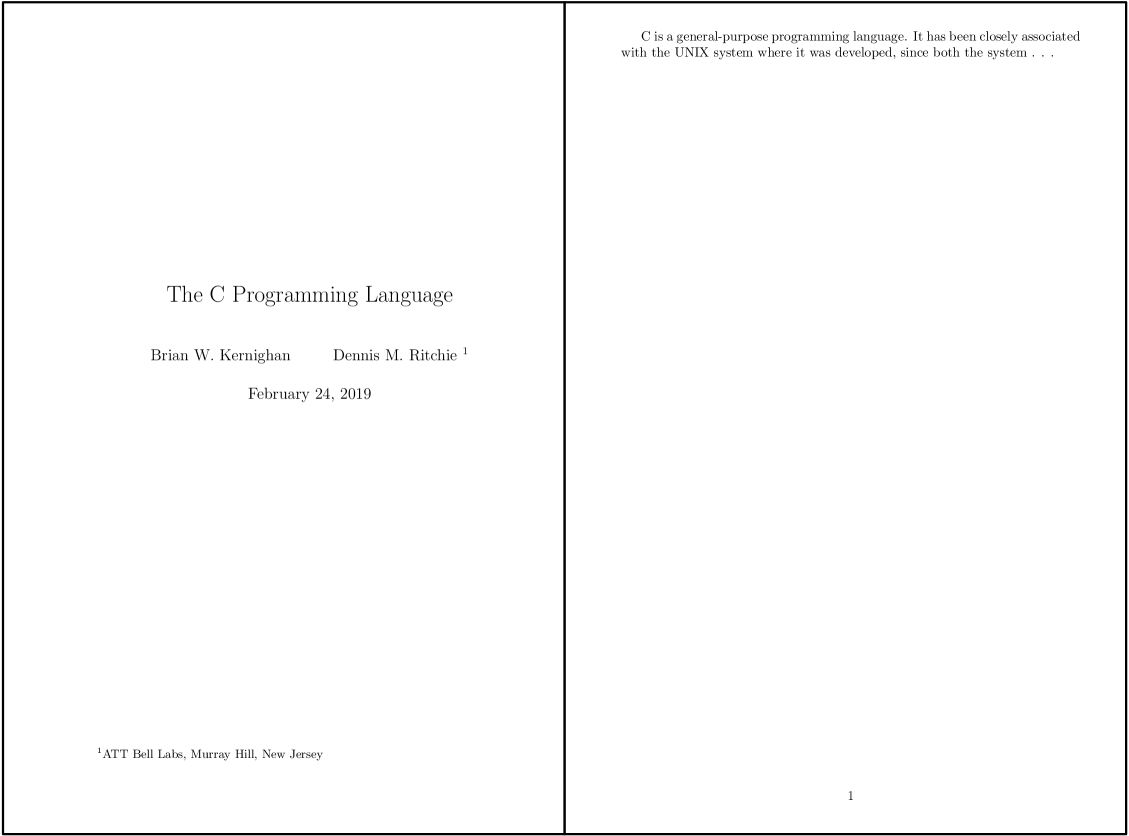
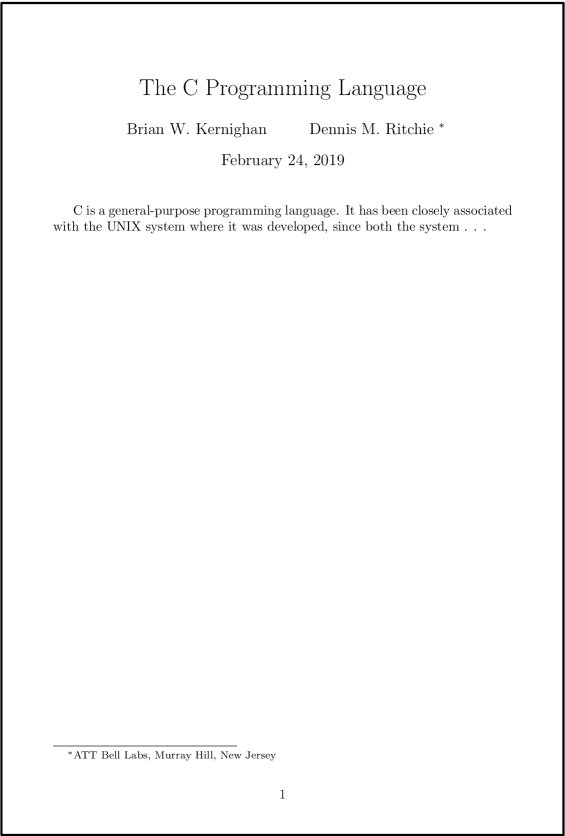
\documentclass{article}

\author{Brian W. Kernighan
\and Dennis M. Ritchie \thanks{AT&T Bell Labs, Murray Hill, New Jersey}}
\title{The C Programming Language}

\begin{document}
  \maketitle

  C is a general-purpose programming language. It has been closely associated with the UNIX
  system where it was developed, since both the system . . .
\end{document}

Classes and Styles
The style of a document is declared in the preamble section using the \documentclass command. It
is important that it is declared first in the preamble, as other commands rely on its input.
There are many styles available for LaTeX documents. The minimum LaTeX build provides the
article, book, report, and letter styles. There are several styles which have been
provided by users that are present in a default build such as memoir and beamer, as they are
used so often by all types of users, the maintainers felt they were worth including.
You can think of a style as a document template (although they are much more complex than that). All of
the information about where and how your text should go in the document is stored there. The
advantage of this type of program is how easy it makes to switch from one style to another. We
can switch the simple title example from the section above from the article format to the
report format and see a noticeable difference in how the output looks.
\documentclass{report}
Styles usually have options available to them. The options can be declared by typing them between
square braces ([ and ]) before the curly braces. Each option is separated by a comma. The
options declared in documentclass are globals, meaning they
apply to the entire document. Unless the user specifically tells the compiler to change the
settings, this will be the default for the entire document.
Options Available to Default Styles
| Command | Level |
|---|---|
| font size | 10pt, 11pt, 12pt |
| paper size | a4paper, letterpaper |
| draft mode | draft |
| multiple columns | onecolumn, twocolumn |
| forumla-specific options | fleqn, leqno |
| landscape mode | landscape |
| document sides | oneside, twoside |
| titlepage behavior | notitlepage, titlepage |
| chapter opening page | openright, openany |
\documentclass[notitlepage, 10pt]{report}
There are a large number of styles available for LaTeX documents that are not included with the default build. Advanced users might even write their own styles for special documents. Perhaps most important to researchers are the publication style sheets. When submitting a document for publication, the journal, school, or group will often make a LaTeX style sheet available to, if used properly, automatically format your document exactly the way they want it.
Each unique style sheet will have a unique set of options. It is important to not expect each style to behave the same as the others. Always read the documentation of the style you choose to use.
It is a best practice to place the file which defines the style (a TeX file with the
.styfiletype) into the root directory of the document, i.e. put it with the.texfile. The compiler will look for the style you declare withdocumentclassin this directory before searching the rest of the system. By following this convention, you make it easier for users to use the correct style sheet.
External Libraries
Sometimes, certain formatting sequences can get very long. Often it is useful to define a command which formats things in the manner we desire, without typing out all of the intricate commands each time. To help with this, it is possible to define functions within LaTeX that perform a series of actions each time they are called. While this is a useful to skill to learn, it is more advanced than this introductory session will cover.
Other users have encountered many similar things before, and they have created functions which do useful and exciting things. Rather than expect every end user to write their own functions, they put them into packages and make them available to everyone.
There are thousands of packages available which work in LaTeX. Each package must be stored online at the Comprehensive TeX Archive Network. You can download packages directly from CTAN, as well as view the documentation. Most LaTeX editors and operating systems have package managers which can be used to download files you need for a package and install them in the correct location.
Packages are called in the preamble with usepackage, just below the documentclass declaration.
Much like documentclass package options are declared using square brackets. Packages called by
usepackage each have unique commands defined within them. When using a package for the first
time, it is recommended to read over the documentation, which lists commands and options, and
often provides useage examples.
As an example, perhaps we need some of our text to use title case, where the first letter of each
word is capitalized. Vanilla LaTeX cannot handle this, so we
call a package which can. For this example, the package mfirstuc is called, and the command
capitalisewords is used as the documentation suggests.
\documentclass{article}
\usepackage{mfirstuc}
\begin{document}
  Some text.  Some more text but \capitalisewords{we need these to have title case}.
\end{document}
Some text. Some more text but We Need These To Have Title Case.
LaTeX can handle any number of imported packages, however some packages interact with each other.
Since LaTeX imports the packages sequentially, in the order that the user includes them, changing
the order of the packages can be a convenient way to avoid problems. Thankfully, there are few
examples of these packages not playing nice, and they are generally addressed in the the
documentation. For example, the commonly used microtype package is known for causing strange
things to happen to your document unless it is loaded last.
Compile Your Document
When you want to view your document, you need to compile it. LaTeX was designed for very old computer systems, so it was designed to only compile when you tell it. That way, you could code everything and never look at the final document until it was finished, if you desired. However, modern computer systems are much more powerful, and compiling a modest document might take only a few seconds. For novice LaTeX coders, this is helpful, as it allows you to periodically view what the result of your code will be.
If you are using a editing suite or online LaTeX tool, compilation occurs when a button in pressed. It will usually be called something like run or build. These buttons execute code behind the scenes. A LaTeX document can also be compiled in a terminal environment. In fact, all the editing suites do is run the commands for you!
For our purposes, we will be generating a document in the PDF format with a command called
pdflatex. The syntax is as follows:
pdflatex document.tex
There are lots of tweaks that you can do with this command line level code, but that is more advanced than will be covered in this course. One specific example to keep in mind for later is
bibtex, which will be covered in a later section. When compiling a document with citations, you must run LaTeX once, generate thebibtexfiles once, then run LaTeX twice. This is a quirk of the system, and has long involved reasons for why it must be this way. However, this won’t be an issue for most users who use an editing tool, as that will handle it automatically.pdflatex document.tex bibtex document.tex pdflatex document.tex pdflatex document.tex
When a LaTeX document compiles, it will generate a lot of “junk” files. They will have filetypes
such as .aux, .log, and .toc, but there are other possible ones. These files contain
information that the current document used during compilation. They can safely be deleted or
ignored without causing problems. Your document will always compile as long as the .tex is
present, along with any .bib, .cls, or image file you have added.
Key Points
Comment text with
%Create a simple document with
documentclassDistinguish preamble from
begin{document}…end{document}Use a
maketitlesection.Use various document classes such as
article,report, andbeamerImport a custom
.clsfileUse the non-standard library `import{textcase}’
Use a command from an imported library ‘MakeTextUppercase’
Export a compiled document as a PDF